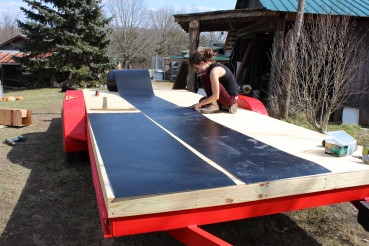
…and now, an appropriately long post about the floor of tiny house…
Stevie and I had no significant experience in construction; he built a shoe rack and I helped build a deck 6 years ago. Despite this many others before us remind us that it is possible and even fun to learn how to build your own house. We took a trip to Lowes (it’s basically down the street) and loaded up a cart with 7 2x4x16 treated boards for framing the floor, and 8 pieces of untreated plywood (four 9/32’’ and four 1/3’’). The idea was to make a plywood sandwich; 9/32 plywood, the framing treated boards and the wool insulation, followed by the 1/2 plywood for the subfloor. We purchased a 24’’x50’ ft roll of metal flashing from a local roofing materials store. The flashing was for wrapping the bottom with, to prevent any kind of water from getting into the house we also picked up some silicon caulk. It was our first trip to Lowes so we also loaded up on some screws for framing and sheathing. We ended up salvaging some random screws from our friend’s dad and a few more pieces of flashing because the 50’ roll was a little short.
The first order of events was to build the frame. We were lazy and put off leveling the trailer since we are considering moving it to a different location on the farm to build the walls. We decided to build the majority of the floor separate from the trailer. However, the trailer was a convenient and flat surface to build on so we laid six the 2×4’s from front to back making them perpendicular to the metal beams going across the trailer. We decided to use the trailer beams as the main support for our structure, so the 2×4’s served as something to create space for our wool insulation and sturdy floor. We the last board in half and put them on the front and back to finish the framing of the floor. Once we screwed the frame together with framing screws we racked and squared it on the trailer it to make sure it was even.
Next it was time for the first side of plywood and the flashing. Our plan was to flip the floor after and bolt it to the trailer. The plywood was cut with a circular saw and quickly attached with shorter screws. Then, the dreaded flashing, I say this because I was mortified by the idea of it slicing my hands. We took the roll of black flashing measured it so that we would have about 3. in overhang on each side and cut it with tin snips.
We laid out all the flashing to see if it was enough to cover the underside of the floor. It wasn’t… The roofing shop did not have rolls bigger than 50’ and neither did Lowes. Again Cullen and his dad came to the rescue: they offer up a small sheet of brown roof flashing which would leave us just one piece of flashing short of covering the entire underside. So we had to get one more 20’’x10’ roll of silver flashing from Lowes to finish the job. Although we did a lot of looking around for all of the flashing, we ended up getting to put a design on the bottom of our trailer. Now even the bottom side of our house will be fly. We laid down the layers of flashing like fish-scales; over lapping them by 3 1/2 inches, caulking on both sides and putting roofing screws down the in between the caulk. It took four of us to lift up the floor and flip it.
Bolting the trailer took a while, but mainly it was finding the intersection of the 2×4’s and the steel beams and mapping out all the spots to drill. I mean, we were drilling serious holes into the most important part of our structure, so we needed the wholes to be just right. Drilling through metal required patience and oil to keep the bit from wearing down we did after all drill 31 holes through our framing and trailer itself. Luckily the bit stayed sharp and we were done in no time.
The most exciting part was filling our floor with the wool we acquired months earlier on a trip to Philly. This nice older couple who decided not to use the wool for their tiny house sold it to us for a steal: 300 bucks! We drove home after that trip with our first purchase crammed into every corner of the Trailblazer. The wool was beautiful, it was Oregon Shepard blow-in insulation and had hints of orange, yellow, brown, gray, white and black. Handling the wool was a joy, with every fluff of it we knew we were increasing the R value of our home.
What we expected to be a short task turned out pretty tedious: hand fluffing the compact wool took hours, however with a few hands we got to press fast forward and finish up the final steps of the flooring. Having our hands in the wool like that with our friends and roommates made us all appreciate and further explore what it means to live in a community. Helping each other with projects: selflessly committing time, recourses and energy makes all of us better off in both the skills we acquire and the enhancement on the quality of life for the individuals as well as the whole. The support we are receiving keeps hard tasks easy, long tasks fast, and brightens the cold rainy days we work through.


